Recent Updates Toggle Comment Threads | Keyboard Shortcuts

  • Madison Scott-Clary (Makyo) 7:50 pm on January 3, 2018 Permalink | Reply  

    Accessing the Juju CLI from within the GUI 

    In the Juju GUI 2.11.1 release, we are excited to bring a new feature we’ve been working on for a while now: the shell in the GUI.

    The GUI is a powerful tool, but at times the command-line is necessary. For instance, the ability to SSH into a unit helps for debugging processes or accessing data directly. Running debug-hooks is another: if a unit is stopped during one of its hooks and you need to see if you can get it up and running, sometimes debug-hooks is your best bet.

    However, not all developer situations have the CLI available. If you’re accessing your environment from Windows, getting to the tools you need from the CLI isn’t trivial.

    To address these cases, we’ve developed the jujushell functionality.

    The shell in the GUI consists of a few different, parallel lines of work. The first is an update in the GUI. This adds the ability to connect to a jujushell server through the browser using the xterm.js library. This will give you a pane into which you can read and write from a terminal.

    The terminal itself is hosted through terminado, a means of providing a shell over a websocket connection. In this instance, the goal is to give access to a terminal running on a server.

    The server is, appropriately enough, a charm. When you deploy this charm to your environment, it will spin up a unit which you will connect to via terminado.

    Naturally, this would be a less than ideal situation in many respects. For one, it might not be secure to run the terminal directly on a unit. If you mess something up on the unit, it can be pretty easy to wind up in an error state in your environment.

    To this end, the shell is not structured to allow connecting to the unit itself, but to LXC containers spun up on the unit.

    These containers are simple and lightweight by design, taking up a minimum of ram, CPU, and disk space. They all have juju installed on them, of course, and as soon as one is spun up, you will have access to your environment. No additional work is needed. You’re already logged into your model from the GUI, so there is no need to log in from the shell, either.

    This connection is managed and proxied via the jujushell service itself. This is a simple service written in Go which will perform a handshake with the GUI, set up your LXC, and then start proxying your connection from the browser, through the unit, to the terminado service running within the container itself.

    That’s a lot of moving parts, but we’ve made it simple to set up.

    The first step is to bootstrap a controller. This will get you up and running with a default model. If you already have a non-JAAS controller, you can do this in one of your already existing models or a new model to play around in.

    Once your controller is bootstrapped, you can open the controller and log in with the address and credentials available from the juju gui command or provided to you by someone with the credentials.

    From within the GUI, search for the jujushell charm (for instance, cs:~juju-gui/jujushell) and deploy it. This will add the application to your model to connect to with the shell.

    Here is a setup done via the CLI following the same steps:

    CLI example

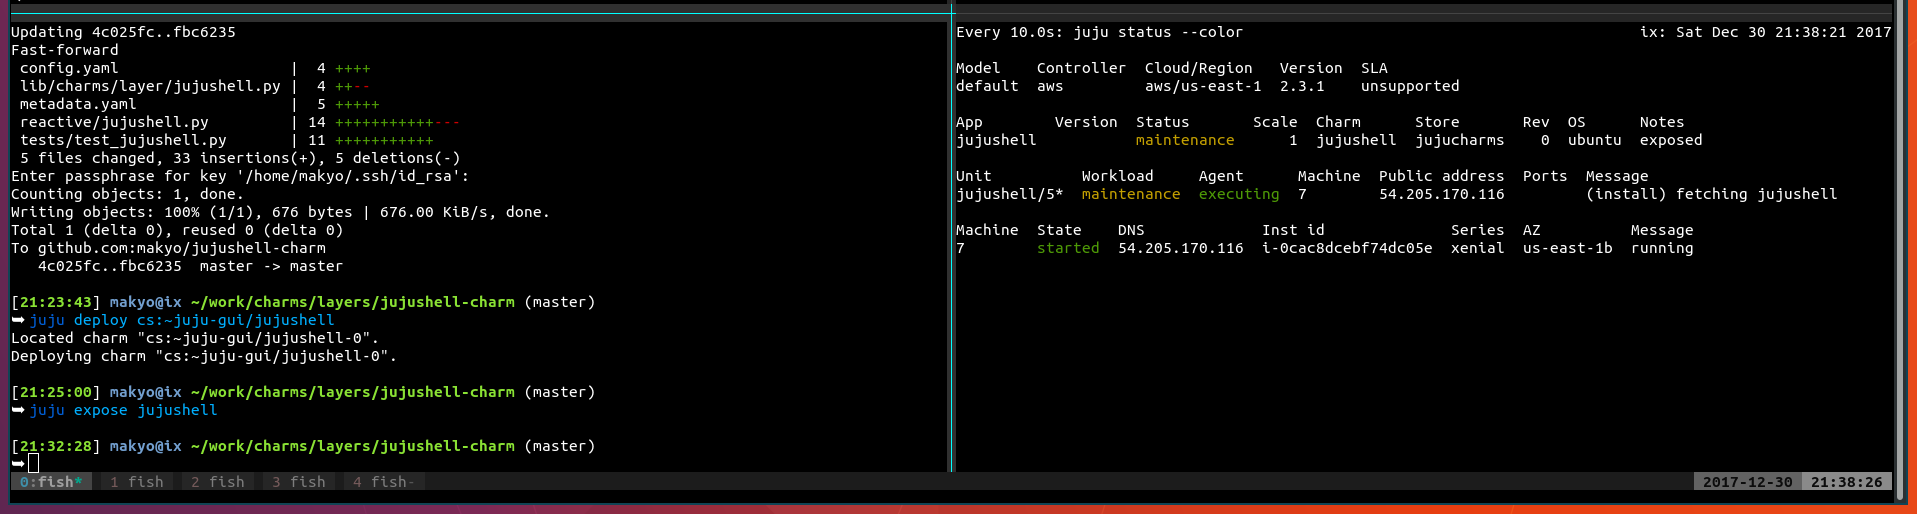
    Once this application is deployed, you will need to expose it and configure it.

    For the configuration you will need a DNS name. This is necessary to allow secure websockets. Internally, the charm uses Lets Encrypt to generate certs, which require a domain name. In the dns-name configuration setting, enter this domain (e.g: example.com).

    Configure the charm

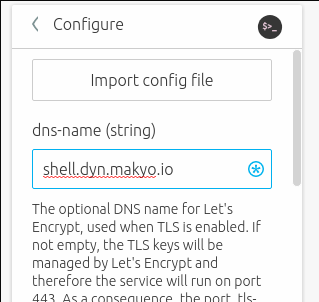
    You will also need to set up your domain name with the IP address of the unit. This can be found in the inspector in the GUI by viewing the unit details.

    Setting up the domain

    Once you have configured and exposed your application, save your changes and click to commit the changes with the button at the bottom right of the GUI. Then, wait for the DNS to propagate and for the unit to be ready.

    At this point, the application is ready to serve Juju CLI sessions. Anyone connected to the controller can use the application, once they’ve set their GUI up to recognize the terminal.

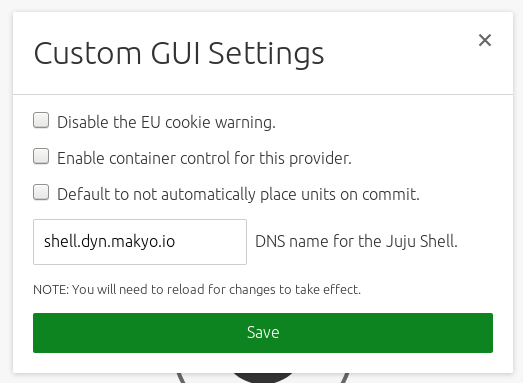
    For this, you will need to open the GUI settings by typing shift+1. In the settings pane, enter in the DNS name for the service in the provided input (e.g: example.com), and click save.

    Setting up the shell address

    From there, you can switch to a model (or click back to the canvas), and you should see a new button appear in the header with a prompt icon.

    When clicked, all of the magic begins to happen. The websocket connection between the browser and the jujushell service is made, the service starts spinning up an LXC. This part may take a second, but once the container is set up, a shell prompt will appear, showing the name of the currently connected model.

    The shell

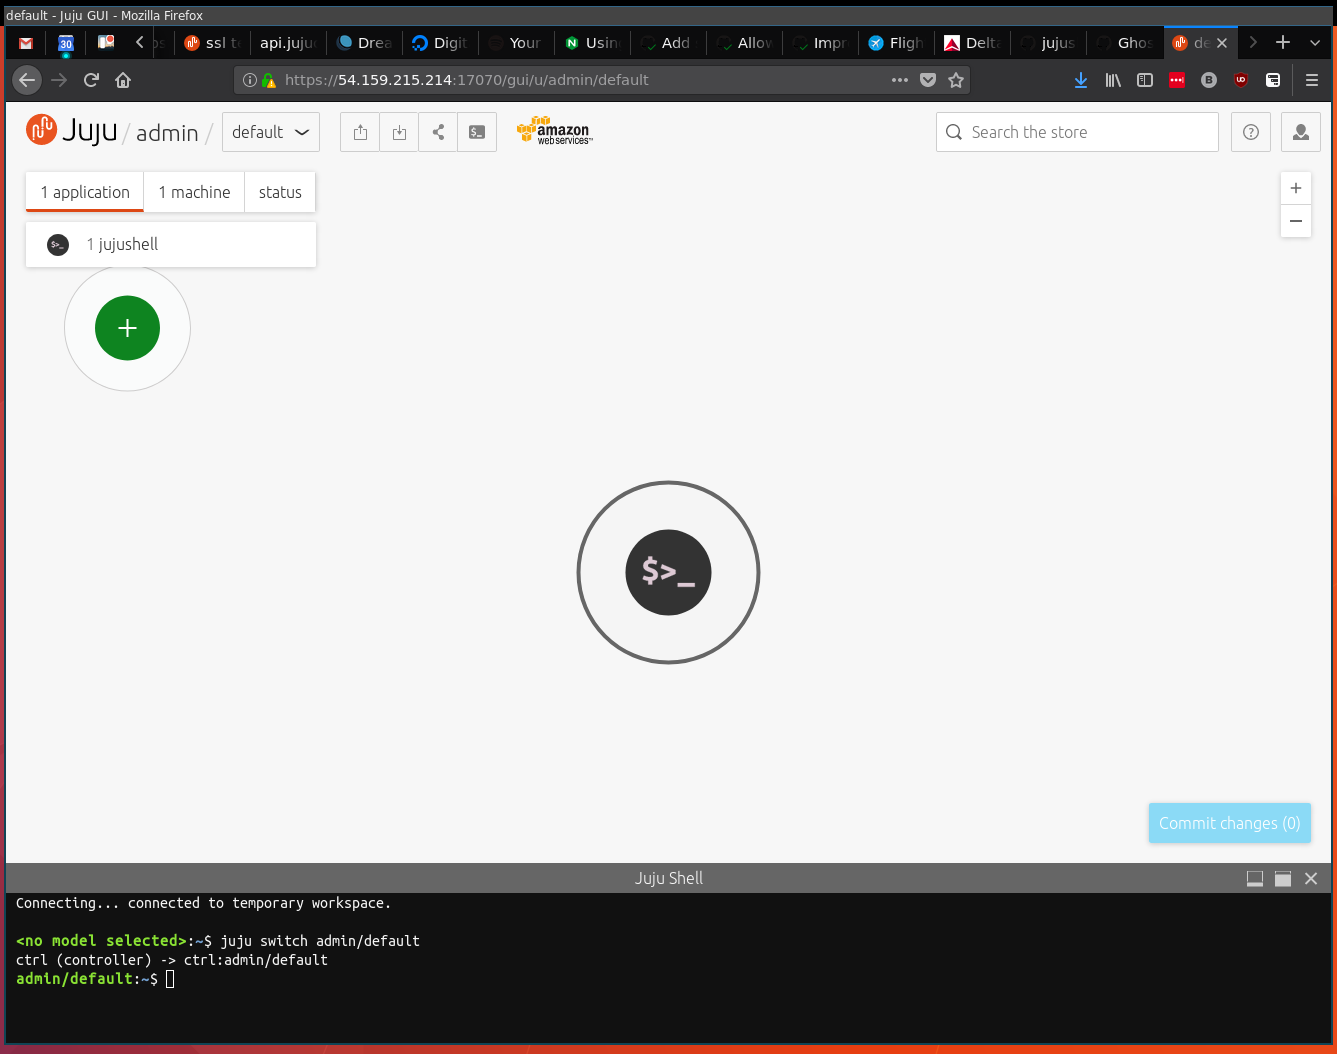
    There you have it, a shell into your model! From here, you can run juju any juju commands — try it out with juju status — and you’re ready to go.

     
  • jeffpihach 3:35 pm on October 30, 2017 Permalink | Reply  

    Juju GUI: get your users started with getstarted.md 

    Help your users get started with your solution by providing them the first steps in using your newly deployed bundle or charm. The latest release of the Juju GUI now displays a rendered markdown file to the user after deploying a bundle or charm with a getstarted.md file.

    Screen Shot 2017-10-26 at 10.12.32 AM

    Adding this functionality to your bundle deployments couldn’t be easier. Simply add a getstarted.md file to the root of your bundle archive with valid markdown and it will be rendered after the deployment has started.

    The getstarted.md file should include the users next steps, and to help you build the best guide possible. We have outlined a few best practices below.

    • State prerequisites upfront so they don’t start down a path they can’t finish.
    • List the minimum number of steps that they should follow to see the charm working at some level of success. e.g get your users to a web dashboard or a REPL. We suggest using fewer than 10 steps.
    • Give your user links to sensible next steps. Link to external resources, most important first.

    Extra points to keep in mind

    • Remember your user is in the GUI.
    • Start instruction with verbs – write in the imperative tense.
    • Write the simplest actions. Concentrate on what they need to do to get started.
    • Use code blocks for CLI commands.
    • Use the format of machines, protocols, and full paths to make reaching the most important endpoints of your application obvious.

    Examples of some quickstart.md files

     
  • jeffpihach 4:28 pm on August 4, 2017 Permalink | Reply
    Tags: , , , , ,   

    JAAS & Juju update: Juju GUI 2.8.0 

    JAAS has seen 2 minor and 6 patch updates in the last nine weeks. Let’s talk about what’s new as of the 2.8.0 release.

    Direct Deploy

    Direct Deploy gets your solutions deployed easier and faster. The feature allows you to create Juju cards which will add the specified bundle or charm to a new model and then open directly into the deployment flow. At this point they simply need to complete the deployment flow and will have a deployed solution without having to manually add or modify the model pre-deploy.

    Screen Shot 2017-08-01 at 1.23.18 PM

    To create a card simply visit https://jujucharms.com/community/cards and enter the charm or bundle id that you’d like to embed. A card will be generated for you which you can embed in your own website or blog.

    cardgen

    Check out the release video of Direct Deploy in action and check back for a follow-up post with details about how you can create your own Direct Deploy card.

    Import & Add SSH Keys

    Users often need the ability to SSH into one or more of the Juju provisioned machines to access generated content, logs, or results of Juju actions. In the deployment flow we now allow you to import public SSH keys directly from GitHub or add them manually. These keys will then be propagated to all of the machines in your model making sure you can ssh directly to them.


    ssh-key-import

    Define and Modify Machine Constraints

    One of the benefits to cloud computing is your ability to tailor the machine hardware to your needs. With the updates to the Machine View, you can now specify a number of constraints for the machines that you’d like Juju to request from your cloud provider. These constraints are now editable pre-deploy in the machine view and shown in the Deployment Flow. These might include 16G of ram or 4 CPU cores.

    Screen Shot 2017-08-01 at 1.28.26 PM

    Model Changes List

    After modeling a complex environment you’ll often want to review the actions that Juju will perform before hitting the deploy button. Now in the Deployment Flow we’ve merged the two change log lists into a single list which groups the changes by application and splits out the machine information into their own lists to make it much easier for you to review.

    Screen Shot 2017-08-01 at 1.29.26 PM

    Users on JAAS are already running the latest GUI and have these features available today!

    If you’ve bootstrapped your own controller you can upgrade to the latest Juju GUI with:

        juju upgrade-gui

    We welcome any feedback you may have. You can chat with us in #juju on irc.freenode.net or you can file issues at: https://github.com/juju/juju-gui/issues

     
  • jeffpihach 5:40 pm on May 22, 2017 Permalink | Reply
    Tags: , , , , ,   

    Juju & JAAS Beta updates: Juju GUI 2.6.0 

    With the public beta release of Juju As A Service (JAAS) on jujucharms.com we’ve been working hard to implement solutions in the Juju GUI to resolve a number of outstanding feature requests from our users. Let’s walk through some highlights.

    Updated Search Results

    We now make it a lot easier to find applications and solutions by others in the community by including those results in the default search results. Simply perform a search, click the community button to see what others in the community have made available.

    Deploying private content from the GUI

    While developing new charms and bundles, it’s nice to keep them private, we now allow you to easily deploy private charms and bundles from your user profile page.

    New Account Page

    For those of you with multiple credentials across multiple clouds we’ve added a new account page which allows you to easily manage them in one location. The account page can be accessed from the user dropdown in the top right. Credentials can be added and removed from here as well as in the deployment flow as usual.

    Terms and Conditions Support

    When installing software it’s common to see a terms and conditions dialogue before you’re able to continue. We’ve now made it extremely easy to view and agree to terms and conditions while deploying charms and bundles. When deploying a charm that requires a term agreement the terms will be presented in the deployment flow prior to being allowed to deploy.

    For those on JAAS you’re already running the latest GUI.

    If you’ve bootstrapped your own controller you can upgrade to the latest Juju GUI with:

        juju upgrade-gui

    We welcome any feedback you may have. You can chat with us in #juju on irc.freenode.net or you can file issues at: https://github.com/juju/juju-gui/issues

     
  • bradcrittenden 8:57 pm on March 1, 2017 Permalink | Reply
    Tags: Beta, ,   

    Introducing JAAS – Juju as a Service 

    Recently on jujucharms.com we opened the public beta of JAAS — Juju as a Service. Let’s explore what JAAS is and how you can participate now in the beta.

    Models and Controllers

    First, a little background to put the changes we’ve introduced into context. Juju allows you to model your service-oriented architecture and manage the deployment to public clouds, OpenStack, local hardware, and containers. Using the GUI, which is installed with every deployment of Juju, you can visualise your model and configure the parts.

    To manage the deployments, Juju requires a controller, a management node that keeps track of all of the components in your deployed model, handles scaling, and all of the other magic Juju does. When you use the command-line command juju bootstrap you are simply creating a controller. If you’re using a public cloud, that controller is a resource you’re charged to use like any other machine. Bear in mind a highly available deployment will require multiple bootstrapped controllers, so your expense for those nodes will be tripled if you have three HA controllers.

    Although it doesn’t take a long time to bootstrap a new controller, it isn’t instantaneous. Further, each controller is an island to itself, any configuration you make to one controller is not reflected in the others. Identity management is one type of configuration that is beneficial to share across models.

    What JAAS introduces is a common controller that is always deployed that you can use to create your models — the things you actually care about. Since it is already running, and maintained by us, you can skip the juju bootstrap step and simply start by using juju add-model to begin your work.

    Public beta of JAAS

    For the public beta we have set up a controller for everyone to use. Every new model created at jujucharms.com/new is attached to the public controller.  You can also access it from the command-line, which will be explained later.

    So with the beta of JAAS we are providing:

    • anonymous user access to modelling in the GUI from jujucharms.com/new,
    • support for all three big clouds (AWS, Azure, and Google) through a single controller, available from a web browser or CLI,
    • identity management across all models,
    • user access management to models,
    • model sharing via URLs, and
    • everything else that Juju offers!

    Use of the controller during the beta period will be free of charge! Models you create will use your public cloud credentials and you’ll be charged for them but the use of the controller is free.

    Getting started

    To start modelling you don’t even have to be logged in. Just visit jujucharms.com/new and begin adding applications from the charm store to your model. When you’re done adding services, applying any custom configuration, and creating the relations between them you can download and save a bundle file or go ahead and deploy to a public cloud. To do the deployment you’ll need to provide your credentials for the cloud and your cloud provider will charge you for those instances you use. Once you’ve added your credentials to the controller they are securely stored for you and you can deploy future models using them.

    Currently we have controllers in two regions for each of the three supported public clouds and will add more as use increases. We provide HA controllers in the U.S. and in Europe for each cloud.

    Sharing

    Maintaining a production environment is a team effort so JAAS allows you to easily share access and management of your models with your project members. When you grant access to others they can see your model in the browser via jujucharms.com or by using Juju on the command line.

    With recent changes to the GUI models are individually addressable via a shareable URL. For instance if I had a model named wordpress it could be shared and seen by going to jujucharms.com/u/bac/wordpress.

    You can also see models shared with you by visiting your profile page at jujucharms.com/u/[your_user_name]. Here is the profile page of my colleague Jeff showing that I’ve shared my wordpress model with him. He’s also got another model shared by Uros.

    screen-shot-2017-03-01-at-12-16-43-pm

    Sharing can be done via the command line with the juju grant command.

    juju grant hatch@external read wordpress

    Or in the GUI using the share button, seen below at the far right.

    screen-shot-2017-03-01-at-15-41-13

    That button brings up a dialog that looks like

    screen-shot-2017-03-01-at-16-34-01

    The user names must include a domain. Currently we use external (e.g. hatch@external) but that will change soon. So, for now, just append @external on the end of your collaborator’s Ubuntu SSO name. Use everyone@external to make a model publicly available.

    Collaborating

    If you have a model shared with you as read-only you clearly cannot make changes to it. But given the URL scheme used you can request changes from the model owner. Suppose Jeff is viewing my wordpress model and wants to add an HA Proxy service. While viewing my model he can search for HA Proxy and the resulting URL in the context of my wordpress model is https://jujucharms.com/u/bac/wordpress/haproxy/40. Jeff could then email me that URL and request I add it to the model. When I go directly to that URL I would merely click the Add to canvas button and it would be done.

    JAAS controller registration

    Models you create on jujucharms.com are already created using the JAAS controller. In order to use that controller from the command line, you need to first register it. This is done with the command:

    $ juju register jimm.jujucharms.com


    Adding a model

    From the command line you add a model using juju add-model. But when working with the JAAS controller you’ve got to provide information about the cloud and region to use since the controller knows about three public clouds with two regions each.

    The following command will add a k8s model to the Google cloud using region us-east1 using the previously saved bac-gce credentials.

    $ juju add-model k8s google/us-east1 --credential bac-gce

    Feedback

    We have worked hard to bring JAAS to this point and it is very functional. This program is currently in a beta state. If you do encounter a bug please let us know by filing it at https://github.com/CanonicalLtd/jujucharms.com/issues. You can also reach the team in real-time in the #juju channel on Freenode IRC.

    Additional resources

    JAAS was introduced on the March 1, 2017, edition of the biweekly Juju Show live podcast. The recording can be found on YouTube.

     
  • jeffpihach 4:55 pm on October 3, 2016 Permalink | Reply  

    Juju GUI 2.2.0 released 

    gui220

    We’re pleased to announce the latest feature release of the Juju GUI.

    With the GA of Juju 2 release coming very soon we’re ready to unveil the new enhanced model management in the Juju GUI. The new GUI allows you to take advantage of Juju 2’s multi-user multi-model functionality as seamlessly as you worked with a single model in the past. You can now create new models, select which region in your cloud to deploy to, add new credentials, and choose which credentials to use when deploying new models.

    For a complete rundown of the new features in the the 2.2.0 release of the Juju GUI check out this video below:

    Changes:

    • New and enhanced model management in this release. This new experience allows you to create new models, select which region to deploy to, add new credentials, and choose which credentials to use when deploying to new models.
    • Add Bundle Service support. This feature allows the GUI to use the external Bundle Service to import bundles when the bundle lib in Juju is not available, such as when in a sandbox or unconnected mode.
    • Add version.json asset which contains the version number and git sha used to build the GUI. To access this file visit the following path replacing the necessary values:
      /gui/[CONTROLLER UUID]/[MODEL UUID]/static/gui/build/app/version.json
    • (Fix) Logging in via USSO when you have no models.
    • (Fix) Update relation list when removing uncommitted subordinate relation.
    • (Fix) No clouds result when listing clouds.
    • (Fix) Switch between unconnected state to connected state.

    To upgrade your existing models to use this version of the GUI:

    Juju 2:

    Run `juju upgrade-gui`
    Run `juju gui –show-credentials`

    Juju 1:

    Run `juju upgrade-charm juju-gui`

    We welcome any feedback you may have on the GUI.  You can chat with us in #juju on irc.freenode.net or you can file issues at: https://github.com/juju/juju-gui/issues

     
  • jeffpihach 5:00 pm on September 8, 2016 Permalink | Reply  

    Juju GUI 2.1.12 released 

    The next version of the Juju GUI has been released!

    This release includes a number of fixes which bring it back in line with the recent changes in the Juju 2 betas which re-enables the ability to switch models from the GUI which was temporarily removed in the previous release.

    Other improvements include:

    • Bundles now use “applications” top level key instead of “services”.
    • Use a different WebSocket connection for the model and controller.
    • Create New Model buton moved into the user profile.
    • Deploying bundles with lxc placements automatically convert to lxd.
    • Multi-series subordinates now have their series locked to the series of the first related parent application.
    • (Fix) Local charms now deploy without issuing error about charm location.
    • (Fix) When relating to subordinates, invalid targets are now faded.

    To upgrade your existing models to use this version of the GUI:

    Juju 2 beta:

    Juju 1:

    • juju upgrade-charm juju-gui

    We welcome any feedback you may have on the GUI, you can chat with us in #juju on irc.freenode.net or you can file issues here: https://github.com/juju/juju-gui/issues

     
  • bradcrittenden 11:00 pm on August 30, 2016 Permalink | Reply  

    Jujucharms.com updated with new channel support 

    With today’s release of the charm store at http://jujucharms.com an important change was made to the channels used when publishing and deploying charms. Prior to this release, the charm store allowed two channels called development and stable. In order to make the experience of using Juju charms and Snappy snaps more consistent, we are adopting the channel names used by the snap store.  From this release forward there are now four charm channels: edge, beta, candidate, and stable.

    The first two, edge and beta, are to be used as development channels. A new charm would first be published to edge, for use by your development team. As it matures, the charm would be published to beta and made available to a wider audience of early adopters.

    The candidate channel is the last pre-release channel along the charm’s journey. It is intended for very mature charms that need one more round of testing and acceptance before being published to the final stable channel.

    When the new charm store was released this morning, charms with development channels were migrated to the edge channel.  To use the new channels with juju you will need to update to the Juju 2.0 beta 16 release as prior versions will no longer work with the charmstore.

    A new version of the charm command-line tool has been released as version 2.2.0. This new version supports the new channels for managing your charms in the charmstore.  It can be found in ppa:juju/stable as debs for trusty and xenial.  Marco Ceppi has also created a snap which you may prefer.  Install it with:

    snap install charm

    Should you experience issues with the new channels or anything related to the charm store, please open an issue at https://github.com/CanonicalLtd/jujucharms.com/issues or find us in #juju-gui on the Freenode IRC server.


  • bradcrittenden 9:56 am on April 15, 2016 Permalink | Reply  

    Juju 2.0 beta 4 — Now with embedded GUI 

    The newest version of Juju has been released, Juju 2.0 beta 4. One of the exciting new features is built-in support for the Juju GUI. Prior to this release one had to bootstrap Juju and then deploy the juju-gui charm or use a tool like juju-quickstart.

    With the new release it has all been greatly simplified.  Bootstrap an environment and you get a GUI running on the controller with no extra effort!

    Once you’ve bootstrapped a controller use this command to see the GUI:

    juju gui –show-credentials

    With that command the GUI will connect to your current model and open a browser to it.  You’ll need to login using the username and password printed in your terminal.

    If you have a controller that has been running for a while and want to get the latest GUI changes, all you need to do is:

    juju upgrade-gui

    That command will download the latest GUI version and replace the one currently running on your controller.

    If you want to see which versions are available run:

    juju upgrade-gui –list

    You can then upgrade or downgrade to one of the available versions by providing it to the upgrade-gui command, e.g.

    juju upgrade-gui 2.1.2

    You can even try a version of the GUI that has not yet been published in the streams by providing the path to a tarball on your local computer, e.g.

    juju upgrade-gui /path/to/release.tar.bz2

    In order to upgrade the GUI, you’ll have to have access rights to the controller. When an administrator upgrades the GUI, users will have to reload the open sessions in their browsers to see the changes.

    If for some reason you don’t want to install the GUI into the controller, simply bootstrap your controller with the –no-gui flag:

    juju bootstrap –no-gui

    We think having the GUI built into controllers automatically will be very beneficial for most users. We’ve worked hard to provide an efficient user experience and hope the interface adds a visual dimension as you model and deploy your services.

    If you find any issues or have any feedback for the Juju GUI, please let us know via our GitHub issue tracker.  You can also contact us in our IRC channel #juju-gui on freenode.

     
  • jeffpihach 5:33 pm on April 13, 2016 Permalink | Reply  

    Juju GUI 2.1.2 released 

    2.1.2gui

    Quickly following our 2.1.0 release, which added support for Juju 2.0, we now have another patch release which brings with it a number of tweaks and fixes to make your Juju experience even better. Notable updates are:

    • Dramatically sped up the time it takes to fetch charm data in the Charm browser.
    • Dramatically sped up the time it takes to deploy bundles from the Charm browser.
    • Refreshed UI for Inspector, Machine View, and Charm browser.
    • Fixed some UI issues in Firefox.
    • Fixed asset paths for Juju 2.

    To upgrade an existing deployment:

    juju upgrade-charm juju-gui

    To deploy this release into your model:

    juju deploy juju-gui

    If you find any issues or have any feedback for the Juju GUI we’d love to hear it. Please let us know in our github repository https://github.com/juju/juju-gui/issues and we’ll be sure to get back to you.

     
c
Compose new post
j
Next post/Next comment
k
Previous post/Previous comment
r
Reply
e
Edit
o
Show/Hide comments
t
Go to top
l
Go to login
h
Show/Hide help
shift + esc
Cancel